Bronze Casting - Step 5
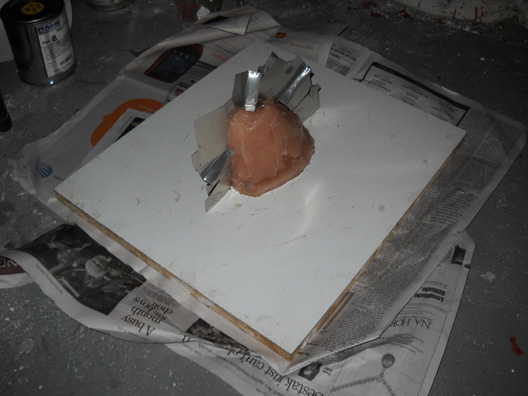
Making the Mold: Inner Mold with Shims

In some case the mold can be peeled off the original model in a single piece and the wax cast like a glove. Such "glove" molds are nice but are only possible if you have a fairly simple statue. Most of the time you have to have the molds in more than one part and so the rubber mold will be cut (at least) in two. In some cases like if you're making a "box mold", you can actually make the rubber mold in separate parts but this requires a bit of finesse and has other drawbacks, particularly in getting the two parts to fit snugly.
As we said there will be an outer shell - or "mother mold" - made of plaster to fit around the rubber mold. That has to be made in at least two parts since a single outer mold would lock onto the inner mold and you couldn't get the model out of the mold.
To get a single piece of rubber into two or more parts, you must, of course, cut the rubber into (two or more) pieces. But for the mother mold - made out of plaster - you have to make the parts separately. Well, we suppose you could get a saw and cut the mold in half, but that might chop up the rubber mold (and the model) more than you want. But most of all you want the parts of fit together nice and snug. So the strategy is to first make half of the mother mold, let it dry, and then make the second half with the first half still in place.
But of course, you have to get the two parts, well, apart. So what you do is add shims to the inner mold. Various type of shims are used, but a common type is bits of metal cut from from metal flashing - the thin metal sheets used to help water proof buildings and roofs. These come in convenient size rolls, are cheap, and can be easily cut with metal cutters.
There is a bit of technique to fashioning and holding the shims in place which will not be dwelt on here. But the shims need to form a reasonably flat wall between the two halves of the mother mold, but with "keys" at different places to help fit the two halves of the mother mold together. You also want to avoid having plaster from the first half leak over to the side of the second, although a little can be trimmed off.
Due to the angle of the camera and the two-dimensionality of the picture, it looks like the shims are sticking this way and that and are not very regular. Actually they are forming a pretty flat wall of fairly uniform height. That's what you want although there were a couple of times where the strips holding two adjacent shims together popped out and had to be replaced.
At this point you coat the whole area - shims, rubber mold, and the area flat surface around the mold with vaseline. If you forget to do that, you probably will have a plaster mother mold stuck on the inner mold. Not only will that likely destroy your mother mold, the rubber mold and possibly the model itself, but it has been known to lead to an unnecessary amount of swearing among sculptors.